Hypercritical
Fill Your TV
As an Amazon Associate I earn from qualifying purchases. Learn more.
On two recent episodes of Accidental Tech Podcast, I talked about calibrating my new TV. The reactions of my co-hosts and the feedback from listeners has made it clear that the entire concept of calibrating a home TV is foreign to most people.
While a full-zoot ISF HDTV calibration is expensive and unnecessary for most people, there are some important steps that every TV owner should take to improve image quality. If you have an iOS device plus either an HDMI output cable (Lightning or 30-pin) or an Apple TV, you can use the simple THX tune-up application to dial in your color, contrast, brightness, and other basic settings.
Before calibrating, don’t forget to turn off all the “image enhancement” features of your TV. These are the things with names like Vivid Color, Color Remaster, Motion Interpolation, Brilliance Enhancer, Black Extension, C.A.T.S., AGC, and so on. Check your TV’s manual for explanations of what each setting does, if you’re curious, but you really do want to turn them all off. They all mess with the image in ways not intended by the creator, and they will make proper calibration more difficult or impossible.
There’s one setting in particular that anyone can adjust without requiring any skill or special software. Let’s say you buy a new 1080p HDTV with a native resolution of 1920×1080. Out of the box, that TV will most likely be configured to never show you a full 1920×1080 pixels of information. In computer parlance, it’s running at a non-native resolution by default, like a 1024×768 LCD display set to a resolution of 800×600.
Imagine this test image exactly matches the native resolution of your HDTV. (It doesn't, so please don't use it to test your actual TV. Use a real calibration app or image instead.)
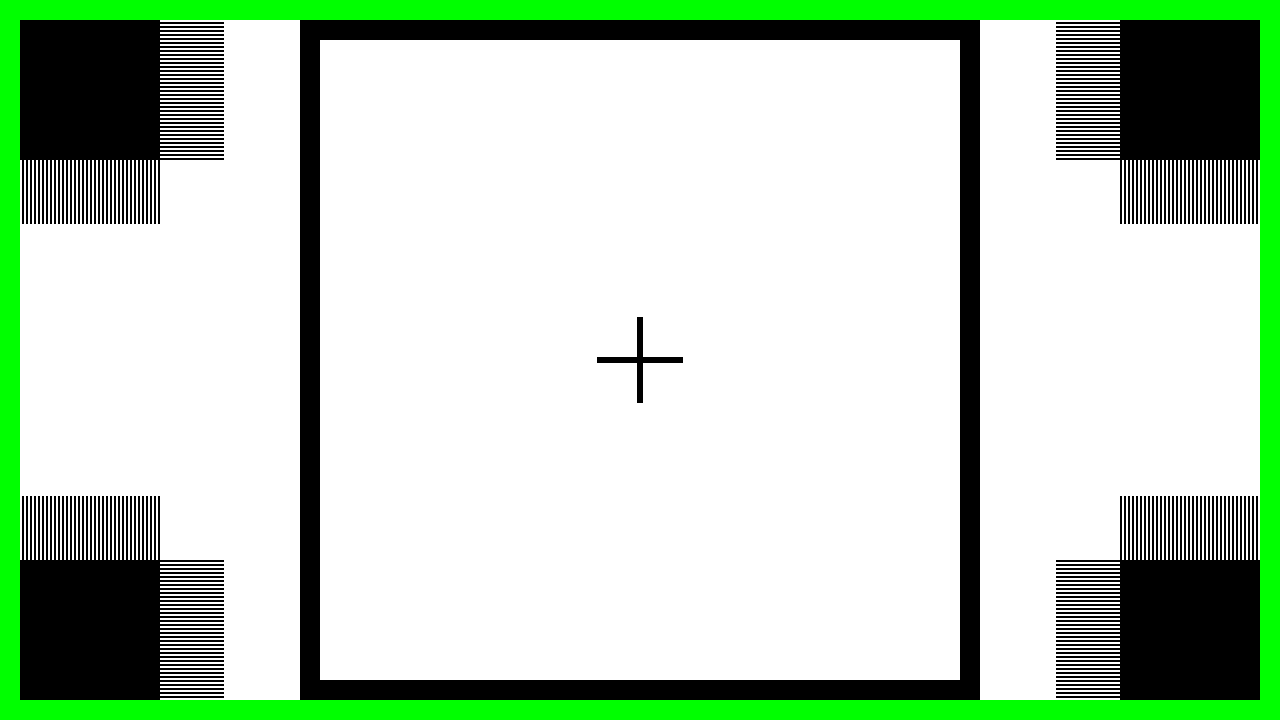
If you’re viewing this post on a Retina display, the thin lines extending from the squares in the corners should be crisp and pixel-perfect. Send this image to your HDTV, however, and this is what you’re likely to see:

The green box is no longer visible; the squares in the corners are now rectangles; the fine lines are now blurred together, producing an unpleasant moiré pattern. You can read all about the origins of this terrible behavior in the Wikipedia entry on “overscan,” but all you need to know is that it’s no longer necessary in the age of HDTV.
You paid for all 1920×1080 pixels of your fancy new HDTV—use them! Most HDTVs have a setting somewhere to correct this problem. It may be called “Overscan,” “1:1 Pixel Mapping,” “Native,” “Screen Fit,” “Just Scan,” or something even more generic like “Size 1” or “Size 2.” Consult your TV’s manual to find out. (If you can’t find your paper manual, a Google search for your TV’s model number followed by “manual PDF” will usually lead to an online version.) Don’t give up; the setting is almost always there somewhere. For TVs with no dedicated setting, you may have to change the input label to “PC” or similar to force the issue.
The nerd-rage I feel at the thought of a display running in non-native resolution may not be something you can relate to, but everyone can appreciate a sharper image that shows more information. This holiday, after you’re done fixing all your relatives’ computer problems and updating their software, take a moment to correct the image size on their HDTV as well. Your relatives might not thank you for it, but I will.